How to try easy silhouettes?

Indian cormorant

Indian cormorant, Munnar

  1. Find subjects with strong and definite shapes
  2. Use bright backlight eg. sun set or sun rise
  3. Choose to use spot metering or partial  metering and take the exposure reading from the background in case of sunrise, the bright sky or clouds
  4. Under expose the shot by one or two stops exposure for brilliant and strong colours.
  5. Focus on the subject carefully and let the edge of the shape is really sharp

    St. Augustine Church

    Ruins of St. Augustine Church, Goa

  6. Include some interesting foreground elements like shapely trees/buildings and let it get in the sky area of the shot.
  7. Try waiting for few birds or other activities as a part of the sky. This will avoid the emptiness and make the sky interesting

    Brihadeeshwarar temple Tanjavur Peria Koil

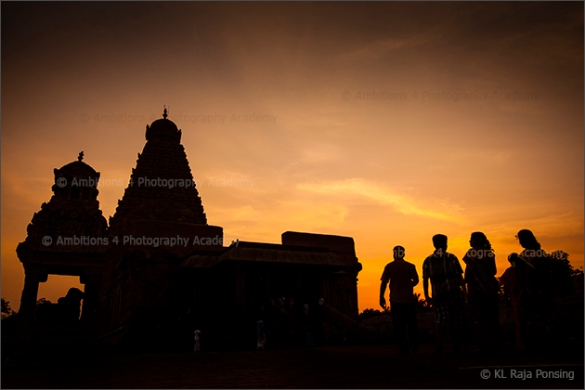
    Brihadeeshwarar temple, Tanjore

  8. If it is a twilight shot consider using a stable tripod to avoid camera shake.
  9. Avoid including moving objects while shooting in dawn. Birds in flight give a kind of blurry patches
  10. Consider off-shooting colours by shifting the white balance intentionally in to warm of cold feel. You can shoot using shade white balance and move the cursor in the white balance shift to amber side for warm silhouettes. Choosing to shoot in tungsten and move the cursor in the white balance shift to blue side for colder silhouettes.
  11. Shoot in RAW for better image variations through Camera Raw correction software.

    Shore temple - Mahabalipuram

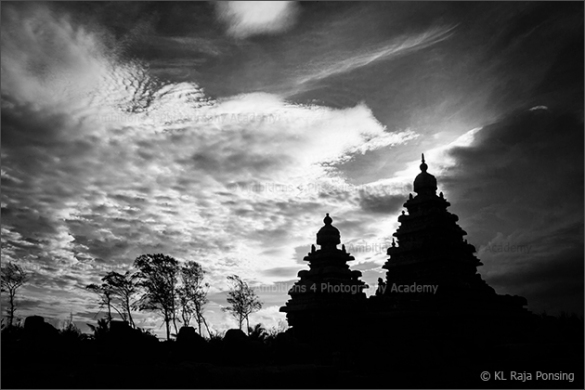
    Shore temple, Mahabalipuram

for more examples of silhouettes click

Elephant’s perspective

elephant ride

The Elephant is always an animal I wonder and observe. I used to dream about riding on an elephant’s back from my child hood. The day came when I went with our bunch of BTEC level 5 students for a photography tour to Wayanad, Kerala. Though I love to be on the elephant’s back, there was an inner fear mixed with excitement when my students insisted me to go for a ride.

With my professional DSLR on my shoulders, I sat on the huge animal with the pride of a King. The point of view from the top was something I saw for the first time in my life. As the elephant moved in action, the jerk on all sides reminded me to be careful. The idea to take few shots from the top of the elephant became secondary. I could feel the huge shoulder bones of the animal moving below my thighs. Before I could realize what is happening, the elephant swiftly negotiated into several narrow paths surrounded by giant trees. I could see the tall trees below my eye level and in the foreground I see the head with a couple of contours and stiff, spiny hair. I attempted few shots carefully holding the camera in one hand (thanks to the auto focus technology and automatic exposure…. And many other automatic feature of my DSLR). It was all a lot of fun throughout the short journey filled with thrill and excitement. I became a child for a while. This life time experience is something one shouldn’t miss.

At the same time, when I stepped down from the elephant, I had a small feeling of guilt as if I had exploited the animal. Of course we fed the elephant with few bunch of bananas and left the place with a mixed feeling.

Click for the Album of BTEC batch 2013 

How to get maximum sharpness in your shots?

Sharpness - coorg

Sharpness illustrated at Tibetan Monastery – Coorg by KL Raja Ponsing

  1. Use good optical quality lenses
  2. Avoid using poor quality filters in front of the lenses
  3. Use manual selection of AF points and AF lock
  4. Use stable tripod while shooting in slow shutter speeds
  5. Use remote shutter release
  6. Use self-timer for still subjects
  7. Use mirror-up option for long exposure shots
  8. Switch off IS/VR controls when the camera is on the tripod
  9. Use lowest possible ISO settings
  10. Use continuous shooting mode for hand held shots
  11. Use reciprocal of the focal length of the lens as the minimum shutter speed for hand held shots.
  12. Zoom in LCD to check the sharpness of the image
  13. Hold the camera firm and use stable posture while shooting. Lean on stable bases like walls or pillars if necessary
  14. Use hard light with good light and shadow effects.
  15. Shoot in RAW to manage the sharpness in Camera RAW image editor.
  16. Use ‘Unsharp’ mask’ in photo shop – People shots (Amount 160%, Radius 01 and Threshold 10). Landscapes and building shots (Amount 70%, Radius 03 and Threshold 2). General subjects (Amount 90%, Radius 01 and Threshold 4).
Sharpness - monastry

Sharpness illustrated at Tibetan Monastery – Coorg by KL Raja Ponsing

http://www.ambitions4.com/courses-/basic-digital-photography-fulltime.html

Easy Photography by KL Raja Ponsing

This video is a part of the television series on Jaya Plus presented by KL Raja Ponsing. He talks about polarizing filter, lens hood, macro lens, exposure, angle etc in this video clip.