How to create the feel of depth in the photos?

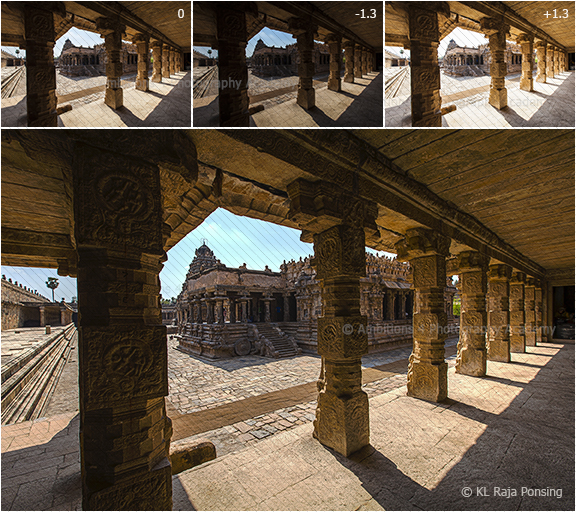
The feel of depth can be understood as the feel of walking through the photo. A photo is two-dimensional and the feel of three dimension is all about the feel of depth in it. An illusion of the third dimension is tried in all the photos to give the feel of reality. It is the added perspective mainly from the point of view. Our eyes can see in three dimension as the scene in front of us is not flat. The feel of variable distance of different objects in the frame is known as the feel of depth.

To establish the depth, the photo must contain multiple planes or layers in it. May be foreground middle ground and a background._MG_4178c

The following tips may give us a feel depth in our photos

  1. Use wide-angle lenses for a greater feel of variation of the object sizes in the frame and the feel of distance in it.IMG_9664c
  1. Avoid using very long focal length lenses as they compress the scene and make it look very flat without depth.
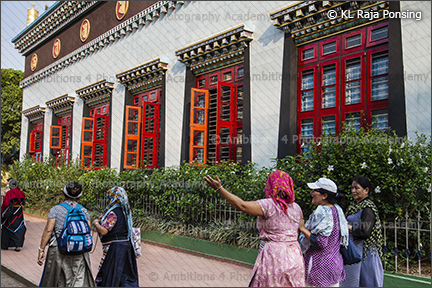
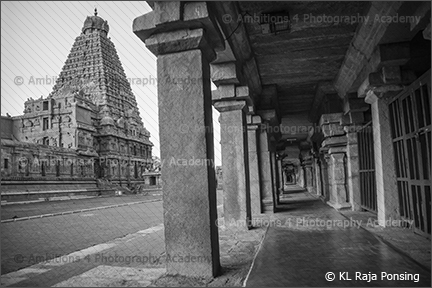
  1. Lookout for multiple planes or layers as seen from the point of view. Every distinct planes will give an additional feel of depth in the photo.IMG_0404c
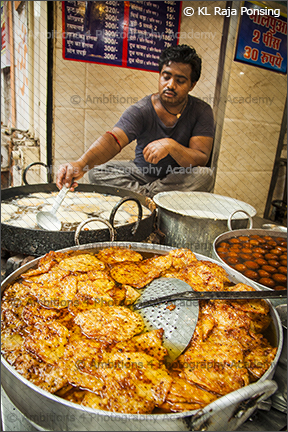
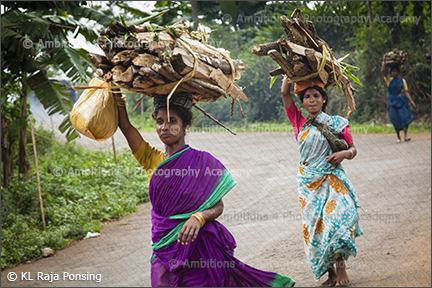
  1. Include or add a foreground element in the scene to get a comparative distance from the main subject_MG_4723c
  2. Lookout for visually identifiable real or imaginary lines or curves running from the corner of the frame diagonally across. This will give an illusion of depth and distance.IMG_9490c
  1. Avoid flat front lighting and use sidelight with good shadows to define the planes and distance.
  1. Shoot from a diagonal angle to give the feel of diminishing perspective. This will give a feel of depth to the scene.   IMG_0242c
  1. Include repetitive and overlapping patterns to add the feel of depth
  1. Use shallow depth of field while shooting portraits and people shots. The out of focus background will give the feel of extra distance from the main subject._MG_0005c

If you found this article useful, please check our Diploma in Professional Photography course , where we explore all the professional aspects of photography in detail. It is an intensive 6 months fulltime course 

How to make HDR images

HDR (High Dynamic Range) images are photos with better details in the extreme brightness areas. In other words, the details of highlights and shadows are fairly good despite of extreme variation in its brightness. Most of our cameras can only give an average details in the extreme bright areas. Unlike our eyes, the sensors of digital cameras are not capable of seeing and recording the extreme brightness in a scene.

In a practical scenario, DSLRs with larger image sensors (full frame DSLRs and medium format DSLRS) perform better than the cropped APS sensor cameras. Larger size pixels in these cameras are able to do retain the details of highlights and shadows.

HDR

On the other hand, we can perhaps shoot more than one exposure, say three shots or five shots or seven shots deviating little more and little less from the camera’s exposure. For example, if the camera’s exposure at ‘0’ is 1/125 f/11, we can also shoot an under exposed image at 1/250 f/11and an over exposed image at 1/60 f/11. In this sequence of three exposures, the first 1/125 f/11 will give the details of the mid tones, the second 1/250 f/11 will give a better high light details and the third 1/60 f/11 will give a better shadow details. Now all the three shots may be sandwiched together for an over all details in all the three tones in an image editing software. Most of the advanced DSLRs can also do this automatically as an in camera post production process.

A HDR shooting and processing is recommended for high contrast lighting scenes like landscapes, Sunsets and Sunrises, interior and exterior shots, shooting from inside to outside shots, night scenes and more.

For a professional HDR shot the following aspects may be considered,

  1. Choose to shoot non moving subjects (a compositing shot of the movement will show it as a ghost effect)
  1. Use a stable tripod for perfect composition and alignment of consecutive shots (three, five or seven.
  1. Use manual focus or auto focus lock to maintain the point of focus as the same in all the shots in the sequence.
  1. Work in aperture priority exposure mode and stay on the say aperture for all the shots. (This will maintain the depth of the field same in all the shots by changing the shutter speed only)
  1. Use manual selection of ISO (avoid Auto ISO because, the change in ISO in otherwise will result in change in noise level)
  1. Decide about the first exposure perfectly – may be some times you need to compensate the exposure. The subsequent exposure in the sequence will change from the first exposure.
  1. Decide the variation of exposure steps (1/3 or 1/2 or 1stops) based on the contrast of the scene.
  1. Decide the number of shots in a HDR based on the contrast of the scene – a seven shot variation will give a smooth transition compared to three shot variations.
  1. Use continuous frame shooting in the drive mode option.
  1. Image correction and editing may be done only on the final HDR image.

If you found this article useful, please check our Advanced Diploma in Professional Photography course , where we explore all the professional aspects of Commercial photography in detail. It is an intensive 12 months fulltime course